Flowstorming is a powerful workshop format, which conducts an exploration aimed to help a team in clarifying and working on the steps in an existing process.
The general formula of flowstorming can be used in any situation where there is a directional flow, which means: there are discrete events happening loosely in a sequence, usually toward a specific goal.
It can help answer these questions:
- What’s the process?
- How can we do this?
- What do we need to get there?
- Are we seeing the full picture?
- Where can we improve?
- How did we get where we are now?
- What was the root cause?
- What is the individual doing to get there?
- …and more.
While the general model can thus be applied to many scenarios (i.e. a retrospective of a complex situation that led to an issue, the steps a user does to reach a goal, etc), in this article we’ll focus on reviewing a process of some kind.
It can be considered a lightweight variant of the EventStorming workshop format.
Goals
Flowstorming borrows from the existing collective experience of a group to reach one main goal:
- Making explicit the needed steps in a flow.
As it happens with the best workshop activities, it also achieves noteworthy secondary goals:
- Creating a shared understanding of each step of the process.
- Creating a shared language and labelling of the process.
- Making everyone aware of who in the group has more experience in certain steps.
- Opening the space for discussion, improvements, and fixes.
For this reason, flowstorming can be either an end on itself by creating shared consensus in a group, or the first exploratory step to improve and refine things.
The workshop
The flowstorming workshop activity usually has two distinct phases: research and synthesis. While the activity can be wrapped up at the end of the first phase, the value added to the team in agreeing on labels, steps, and reducing the process to the essence is incredible.
- Total time: 2-3h
- Number of people: 8
The size of the group can vary, but this is roughly the ideal number of people that should be in the room. It’s ideal to have expertise from all different parts of the process that is being subject of the workshop activity.
Research Phase
This should last about 1-2 hours.
- Intro (5’)
- Explain that we’re doing to do an activity mapping all the steps in the process of starting and closing a project.
- Each post-it is a single step / event in the process from start to end.
- We shouldn’t be too specific about the level of abstraction of post-its: some might be fairly specific and requiring little time (i.e. “Decide X”), some others might be wider (i.e. “Code Story”).
- Include all the roles and teams involved in the process to the best of your knowledge: strategy, design, marketing, development, PR, etc.
- Framing (2’)
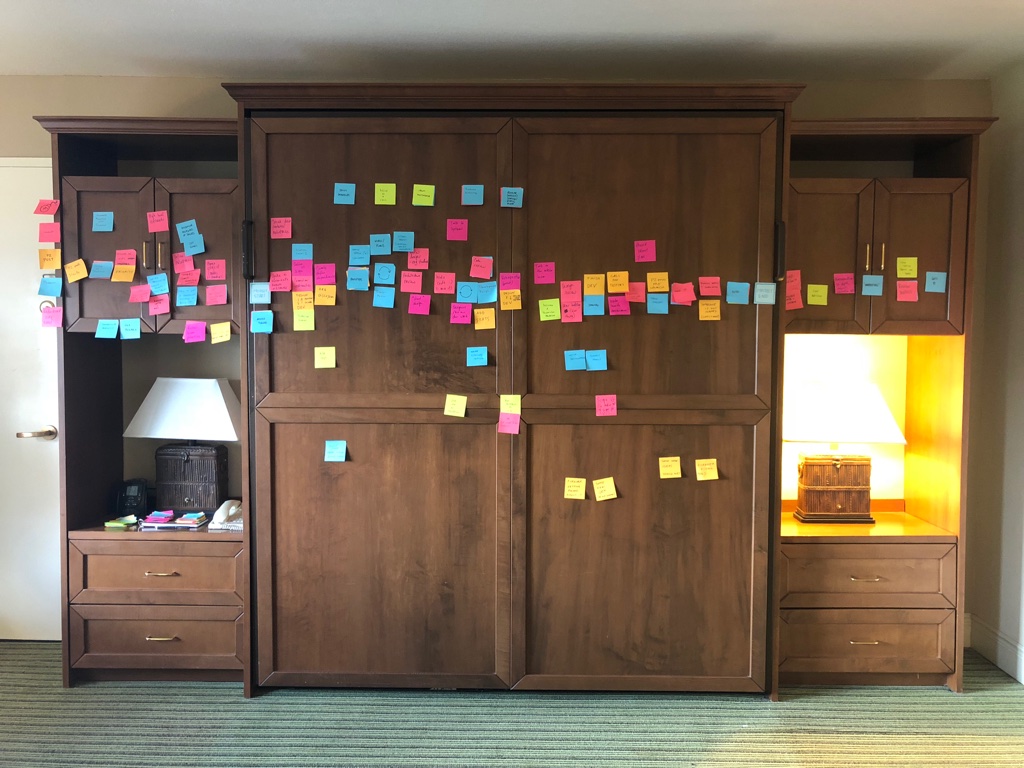
- Prepare the wall: put on one end a post it with written on it “Begin” and on another “End”, wide apart, so people can fill within. Leave space before and after.
- Point out explicitly that they can add post-its of things happening also before “Begin” and after “End”. These are very important for context and to capture things that might not seem to belong inside the process.
- Writing (10’)
- Everyone, alone and without talking, writes down ALL the steps that happen in that process.
- One step / event per post-it.
- Post-Up (5’ x Person)
- Everyone in turn goes up to the wall, explains, and puts the post-it in the right place in the sequence.
- The facilitator will move post-its if space is needed.
- As much as possible, try to have post-its in a clear sequence, with minimal overlap. If two post-its refer to the same thing, try to have a quick discussions on which one has the better wording, or create a new one.
After this a break is very likely needed.
Synthesis Phase
This should last about 1 hour.
- Setup (2’)
- Now take another wall or table, and replicate the “Begin” and “End” post-its.
- Step Definitions (time as needed/available)
- Go through the entire wall, and start extracting the most important steps. Going from “End” backwards usually helps discussions.
- This should be a bit more facilitator led. Use your own experience to extract the steps that feel important. Ask questions and elicit discussion on each of them until a good degree of clarity is reached. Notice when people disagree and have them voice their perspective.
- Try to extract steps roughly at the same level of abstraction.
- For each step summarized discuss the right word for that step, and write on a new post-it.
- The synthesis should be a single, linear line of sequence of steps.
- There might be loops, but they are assumed as “going back to a step” so the baseline is linear. Imagine like this was a huge kanban board.
- Many processes allow to go back. It’s fine, doesn’t have to be marked everywhere.
- If there’s some loop that is core, that can be either represented by a single post-it (i.e. “Build Story” might be composed by multiple iterations of writing PRs, reviewing, etc) or can be turned into an explicit loop composed by a few steps.
- Use your skills to assess what is relevant to be made explicit.
- Some activities can be considered ongoing. Add them separately if important, for example above or below.
- Discussion (10’)
- Review the updated process and all the steps, and allow everyone to comment on it, and how it feels now they see it there.
Write Up
It’s important to share the findings in a way that can be referred again by everyone in the group, as well to be discussed with everyone else. It can be for example transcribed in some internal communication channel.
Try to explain things, but not overly verbose. At minimum, provide a numbered list with all the steps in the process, again from begin to end.
This sequence could be also represented more visually, like a digital version of the wall that was used. This is also useful, adapt depending on the kind of discussion you want to have and what’s the best practice to have most people check it out.
While the name choice should be self-explanatory, it could also be useful to add a one-line explanation for each step in the process, but don’t get too deep in any of these. Try to keep the same level of description for all the steps.
How to use the results
Before moving to what can be done with the synthesis emerged from the above, it’s important to remember one thing: the team has already gained valuable insights. There’s likely a better understanding, agreement, and shared language in the group of people that participated. This alone is a major achievement.
It could be useful to write down too what are the next steps from here:
- Review the overall process — do a few iterations until all the label and all the descriptions are well understood and clear within the group.
- Deep dive in a step — if there are steps unclear, or that require more work, you can consider a deeper dive. For this you could run this exercise again, this time with “Begin” and “End” to refer to that specific step.
- Review the prompts — it’s very useful to have one visible, explicit, existing trigger point for each step. When does this step starts? Does it depend on something else to happen before? It’s very hard to do steps that aren’t clear on when they start.
- Embed them in your other systems — include a clear explanation of the process in your documentation or even hiring on-boarding. Review tools and practices to make sure they use the updated language. Make sure the prompts are clear.
- Differential check — run this again 6 or 12 months later, and check the differences, then discuss what changed then from now. Why are there differences?
Historical Note
A few years ago I was supporting a team that was looking on ways to improve their work. Once I setup the exercise and started doing it, one of the people in the room said “Ah yes, now I remember: this seems very similar to EventStorming”. I had no idea what it was at the time, but looking up I found lots of other resources.
As it often happens, good ideas are shared and happen multiple times in multiple places. I’m very thankful to Alberto Brandolini for being open in sharing his experience and welcoming Flowstorming as an EventStorming variant.
Thanks to Cate Huston for suggesting me to write down the workshop, and for her enthusiastic adoption and sharing of the format.